A DIY Guide to Skim Coating Walls and Ceilings
Skim coating applies a thin layer of joint compound to smooth damaged or textured walls and ceilings. This guide provides step-by-step instructions for do-it-yourself homeowners. It covers surface preparation, material selection, application techniques, and essential safety measures.
What Is Skim Coating?
Purpose and Application
Skim coating is a cosmetic technique that applies a thin layer of joint compound, known as "mud," across an entire surface. 1 It is used to smooth, repair, or upgrade a wall or ceiling to create a uniform, flat plane ready for priming and painting. 3 Skim coating is an aesthetic repair that solves surface problems like fine cracks, damage from wallpaper removal, or unwanted textures. 1
It can also be used to improve a new drywall installation to a higher standard of finish. As a method of renewal, it is more efficient and less expensive than replacing the entire drywall or plaster. 5
Skim Coating vs. Mudding and Spackling
Distinguishing skim coating from similar tasks prevents using the wrong materials and getting poor results. While both skim coating and "mudding" use joint compound, mudding is the initial process of taping and covering joints between new drywall sheets. 7 Skim coating is a more comprehensive step where a thin layer of compound is applied over the entire surface, including the mudded joints and paper fields, to create a single, uniform finish.
The distinction from spackling is also critical. Spackling paste is a different material used for minor, isolated repairs like nail holes or small dents. 7 Spackle dries harder and faster than joint compound and is not designed to be spread thinly over large areas. 7 Using spackle for a skim coat is a serious error, as it is difficult to sand and paint will not adhere to it reliably. 7 Joint compound is the only appropriate material for a true skim coat.
Achieving a Level 5 Finish
In professional trades, skim coating is the key feature of a "Level 5" drywall finish, the highest quality standard. 3 A Level 5 finish is a standard Level 4 finish that receives an additional, thin skim coat over the entire surface. 14 A Level 4 finish, common in residential construction, involves three coats of compound over all joints and fasteners, followed by sanding. 4
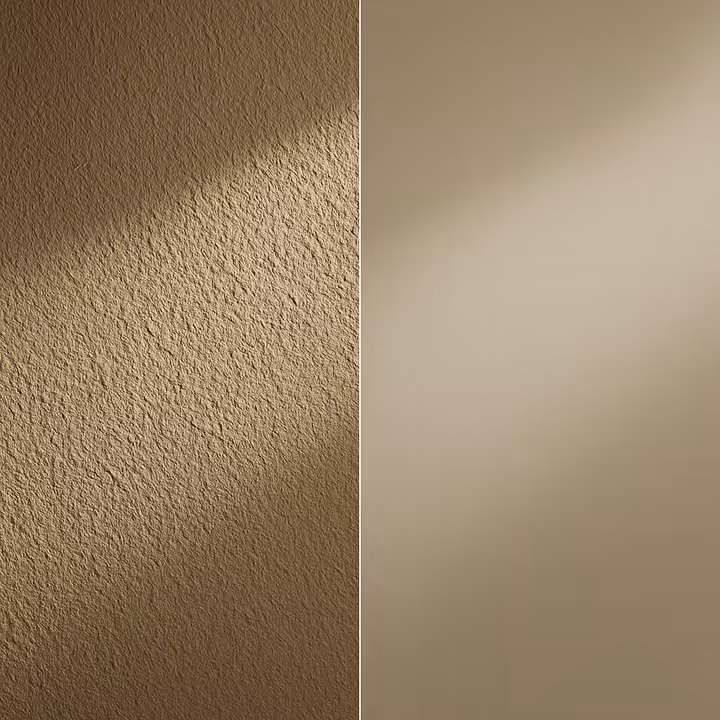
The upgrade to Level 5 is specified for areas where appearance is critical. This includes surfaces exposed to "critical lighting," where light from a window or fixture strikes the wall at a shallow angle, exaggerating minor imperfections. 4 A Level 5 finish is also recommended for surfaces receiving gloss or semi-gloss paints, which highlight differences in texture. 15
On a Level 4 wall, the sanded compound over seams has a different texture than the gypsum panel's paper face. 6 These two surfaces absorb paint differently, creating a blotchy effect known as "flashing" or "photographing". 4 A skim coat prevents this by creating a single, homogenous surface texture. 3 For a DIYer, skim coating is a way to achieve a high-end, modern look by creating a perfectly uniform surface.
Materials and Tools
Choosing a Joint Compound
Choosing the right joint compound affects the project's difficulty, timeline, and durability. Joint compounds are categorized into two main types based on how they harden.
Drying-Type (Air-Dry) Compounds are vinyl-based and harden as water evaporates. 18 They have a long working time, making them ideal for beginners. Drying typically requires 24 hours between coats and depends on temperature and humidity. 20
- All-Purpose Joint Compound: This conventional-weight compound has strong adhesives, making it the best choice for embedding tape and applying the first skim coat. 22 While it can be used for all coats, it is dense and harder to sand than topping compounds. 26
- Topping Compound: This compound is formulated for final coats. 28 It is lighter, shrinks less, and is much easier to sand to a smooth finish, but it has less adhesive strength. 27
- Lightweight All-Purpose Compounds: These modern formulas are lighter, shrink less, and sand more easily than traditional all-purpose muds. 24 They are a good compromise for second and third coats but result in a softer, less durable surface before priming. 22
Setting-Type ("Hot Mud") Compounds are gypsum-based powders mixed with water on-site. They harden through a chemical reaction, not evaporation. 18 They set in a predictable time (e.g., 20, 45, or 90 minutes), allowing a professional to apply multiple coats in one day. 32 However, they are unforgiving for beginners because once the mud becomes unusable, it is very difficult to sand. 19
The following table provides a clear comparison to guide your selection:
| Feature | Drying-Type Compound (e.g., All-Purpose, Topping) | Setting-Type Compound (e.g., "Hot Mud," Easy Sand) |
|---|---|---|
| Hardening Process | Evaporation (Air-Drying) 18 | Chemical Reaction (Setting) 18 |
| Working Time | Long; remains workable until it dries out 18 | Fixed and Short (e.g., 20, 45, 90 mins) 31 |
| Drying/Setting Time | ~24 hours per coat; highly dependent on humidity & temp 20 | Predictable and fast; not dependent on humidity 32 |
| Shrinkage | Higher, especially when thinned 10 | Very Low 31 |
| Hardness/Sandability | Softer, much easier to sand 19 | Very hard, difficult to sand 19 |
| DIY-Friendliness | High: Forgiving, allows for a slower, more deliberate pace. | Low: Unforgiving, requires speed, precision, and experience. |
| Best Use Case | All-around skim coating, especially for beginners. Use All-Purpose for the first coat and Topping/Lightweight for subsequent coats. 22 | Deep fills, patch repairs, humid environments, or for professionals needing to apply multiple coats in one day. 33 |
Required Tools
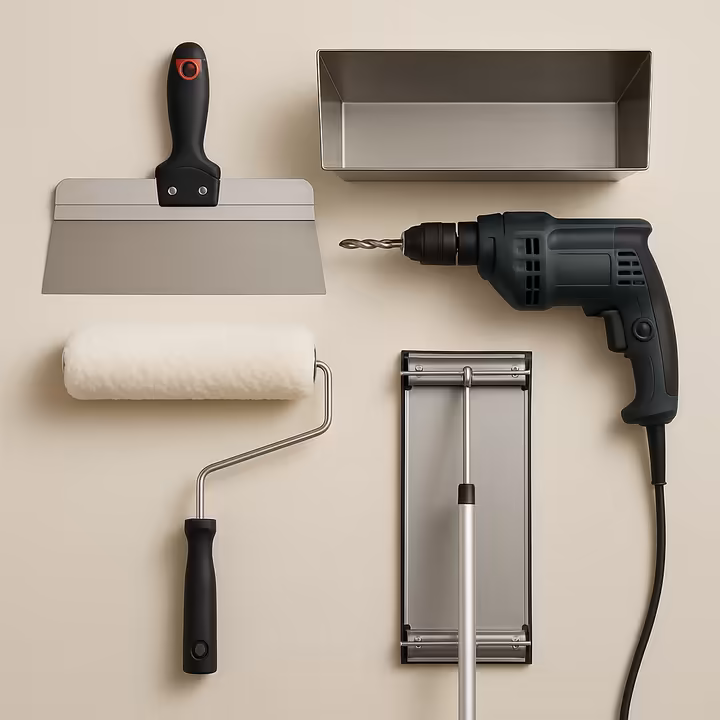
The correct tools are essential for a professional finish and for safety.
- Mixing: Use a clean 5-gallon bucket, a heavy-duty 1/2-inch drill, and a metal paddle mixer to achieve a smooth, lump-free consistency. 35
- Application & Handling: A metal or plastic mud pan holds a manageable amount of compound. Use a paint roller with a thick, 3/4-inch to 1-1/4-inch nap cover to apply the compound to the wall quickly and evenly. 3
- Smoothing: A flexible 12-inch or 14-inch stainless steel taping knife or a dedicated skimming blade is the most critical tool for smoothing. 3 A smaller 6-inch knife is needed for scraping ridges and working in tight areas. 39
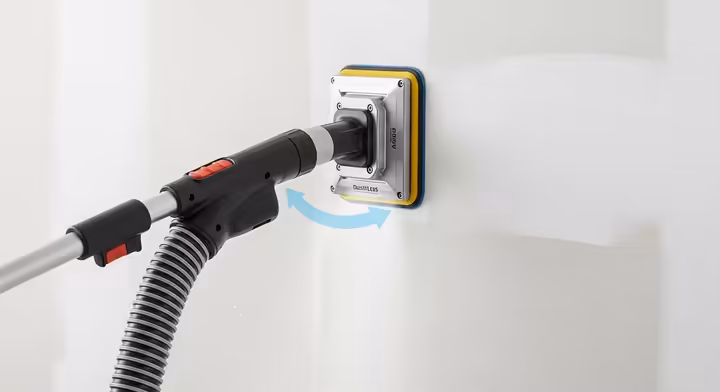
- Sanding and Dust Control: A pole sander is necessary for large surfaces, using fine-grit sandpaper (120 to 220-grit). 37, 40 For any significant sanding, a vacuum-assisted sander connected to a shop vacuum with a HEPA filter is an essential safety tool. This system captures harmful dust at the source. 36
Safety Precautions
Skim coating can create serious hazards, especially airborne dust. Following safety protocols is essential throughout the project to control these risks at their source.
Silica Dust
The most significant chronic hazard in drywall work is inhaling respirable crystalline silica (RCS). Many joint compounds contain silica, and sanding cured compound generates fine dust that can be inhaled deep into the lungs. This exposure can lead to incurable diseases like silicosis and lung cancer. 43
OSHA's standard for silica (29 CFR 1926.1153) provides a definitive safety framework for DIYers. 48 The standard sets a very low Permissible Exposure Limit (PEL) of 50 micrograms per cubic meter of air (50μg/m3), meaning even a small amount of visible dust is a health hazard. 49 The following controls are mandatory:
- Engineering Controls: The first line of defense is to capture dust at its source. A vacuum-assisted sander connected to a HEPA-rated vacuum can reduce airborne dust by over 95%. 43 Using low-dust joint compounds , which make dust particles heavier, is a secondary control. 24 Wet sanding with a sponge is a dust-free alternative that is slower and requires more skill. 36
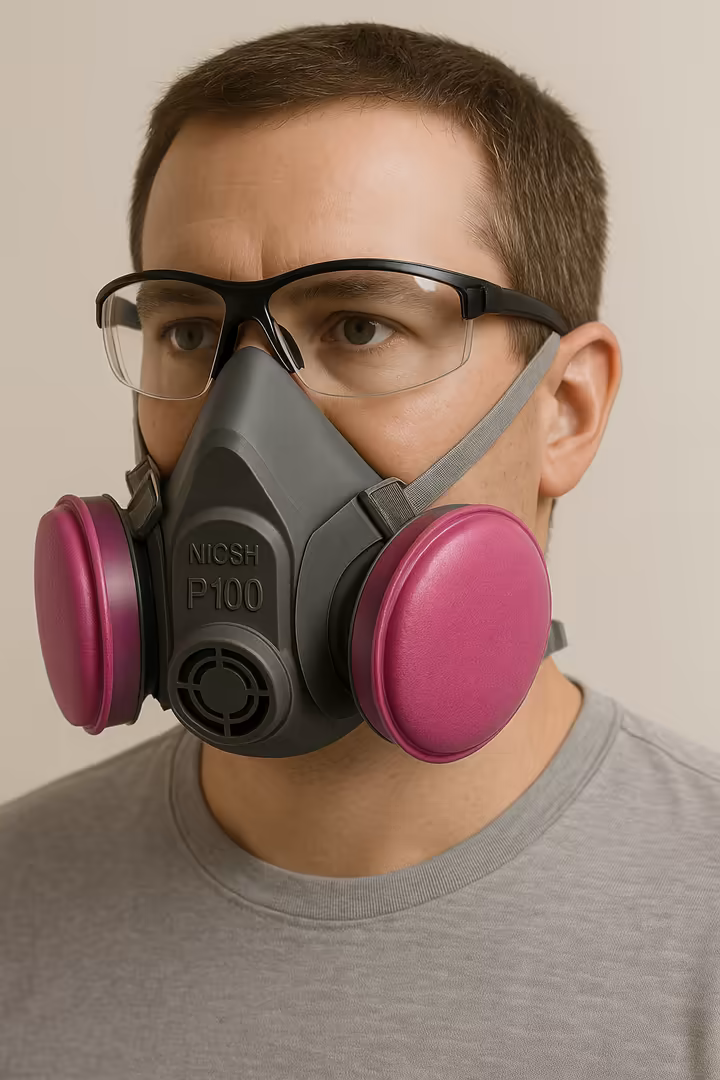
- Personal Protective Equipment (PPE): Respiratory protection is always required during dusty work. A NIOSH-approved N95 or P100-rated respirator must be worn when mixing powdered compound, sanding, or sweeping. 53 Safety glasses are also essential to protect your eyes. 37
Asbestos in Popcorn Ceilings
Popcorn ceiling textures in homes built before the 1990s often contain asbestos, a known carcinogen. 55 Disturbing this material can release asbestos fibers, which can cause fatal diseases years after inhalation. 54
- Non-Negotiable First Step: Testing. Before any work on a popcorn ceiling, it is absolutely mandatory to have a sample professionally tested by an accredited laboratory. 54 Do-it-yourself test kits that facilitate sending a sample to a lab are widely available. 55 Under no circumstances should you assume a ceiling is asbestos-free based on age alone.
- Protocol for Positive Test: If asbestos is present, the EPA strongly advises against DIY removal. Hire a trained and accredited asbestos abatement contractor. 57 Safer alternatives include encapsulation (sealing the surface) or enclosure (covering the ceiling with new drywall), which contain the hazard without disturbing it. 56
Lead-Based Paint
Any house built before 1978 is presumed to contain lead-based paint. 59 Sanding or scraping these surfaces creates toxic lead dust, which is especially dangerous for children and can cause permanent neurological damage. 60
- Required Controls: DIYers in a pre-1978 home must follow the EPA's Lead-Safe Renovation, Repair, and Painting (RRP) program guidelines for safety. 59 Key practices include:
- Containment: Isolate the work area from the rest of the home with heavy plastic sheeting, sealing doorways and HVAC vents. 59 Turn off the HVAC system to prevent circulation of contaminated dust. 59
- Dust Minimization: Use wet methods like misting surfaces with water before scraping. 59 Never use open-flame burning or power tools (sanders, grinders) that are not equipped with a shroud and a HEPA vacuum attachment. 61
- PPE and Cleanup: Wear a NIOSH-approved respirator with P100 filters, disposable coveralls, and gloves. 59 Clean with a HEPA vacuum and wet wipes, then carefully bag all contaminated materials for disposal. 59
General Worksite Safety
- Electrical Safety: Turn off power at the circuit breaker to all outlets and switches in the work area. Remove cover plates to allow for a clean finish. 3
- Ladder Safety: Use a ladder appropriate for the height, placed on a firm, level surface. Always maintain three points of contact (two feet and one hand) and never overreach. 65
- Ventilation: Maintain good airflow to help dissipate VOCs and aid in the drying of the joint compound. 68
Surface Preparation
Proper surface preparation is the most important factor for a durable finish and prevents issues like blistering and peeling. 39 Good prep ensures the compound will adhere properly.
- Clean the Walls: Thoroughly clean the surface to remove grease, grime, and other contaminants that prevent bonding. Wash walls with a trisodium phosphate (TSP) solution, then rinse with clean water and allow them to dry completely. 39
- Scrape and Pre-fill: Use a putty knife to scrape off flaking paint or high spots. 71 Pre-fill any deep gouges, cracks, or holes with a setting-type ("hot mud") compound before starting the overall skim coat. 40
- Scuff-Sand Glossy Surfaces: Joint compound adheres poorly to smooth, non-porous surfaces. Scuff-sand any glossy or semi-gloss paint finishes with 120- or 150-grit sandpaper to create a "tooth" for the compound to grip. 40
- Prime Before Skimming: Priming before you skim coat is a critical step that prevents problems. A quality stain-blocking or bonding primer seals the surface, preventing the old paint from bubbling and ensuring the skim coat dries evenly. 30 This step is mandatory when working over torn drywall paper, which will otherwise blister. 6 Priming before skimming is a best practice that improves the quality and longevity of the job. 3
How to Apply Skim Coat
Mixing the Compound
The consistency of the joint compound is key to its workability. Start with a fresh bucket of compound to avoid dried bits that can create streaks in your finish. 35 Use a heavy-duty drill and paddle mixer, adding water slowly; it's easier to thin a mix than to thicken it. 77 For the first coat, a thicker mix resembling yogurt works well, while subsequent coats are better with a thinner consistency like pancake batter. 3, 77
Application Methods
The goal is to apply material and then remove the excess, filling only low spots. Each coat refines the surface further.

The Roller and Blade Method (DIY-Friendly): This technique is recommended for beginners because it separates applying the mud from smoothing it. 79
- Work in manageable sections, about 3-by-3 feet, so the compound doesn't dry before you can smooth it. 5
- Use a heavy-nap paint roller to apply a generous, even layer of thinned compound onto the wall section. 36
- Immediately take a wide (12-inch or wider) taping knife, hold it at a low angle, and pull it smoothly across the surface to squeegee off the excess. This leaves a thin, smooth film. 3
- Wipe the blade clean on your mud pan after each pull. This critical step prevents dragging dried bits through the next section. 3
- Overlap each pass slightly to blend strokes. To maintain a "wet edge" between sections, you can lightly mist the edge of the just-smoothed section with water. 36
The Traditional Knife and Trowel Method: This classic technique involves applying and smoothing mud in the same motion. 73 It offers maximum control but has a steep learning curve and is challenging for a novice.
Layering and Smoothing
A quality skim coat is built up through a series of thin, systematic layers.
- Coat Thickness: Each layer should be thin, between 1/16-inch and 1/8-inch at most. 5 Applying compound too thickly causes cracking and long drying times. 84
- Multiple Coats: A smooth surface requires at least two, and often three, thin coats of compound. 6 The first coat fills major imperfections, and subsequent coats refine the surface.
- Directional Application: Apply each successive coat at a right angle to the previous one (e.g., first coat vertical, second coat horizontal). This cross-hatching helps eliminate waves and troughs. 73
- Scraping Between Coats: Do not sand between coats. Instead, once a coat is dry, use a clean 6-inch drywall knife held at a sharp angle to scrape down any ridges or tool lines. This creates a flatter base for the next coat. 39
Skim Coating Different Surfaces
The application method depends on the wall surface. Using the wrong preparation or material will cause the skim coat to fail.
Skim Coating Textured Walls and Popcorn Ceilings
For walls with a heavy texture, first use a wide drywall knife to scrape down the highest points. 41 This reduces the amount of compound needed. After scraping, clean the wall, scuff-sand if it has a sheen, and prime with a bonding primer before applying mud. 41
Popcorn ceilings require a safety-first protocol. As detailed earlier, it is absolutely mandatory to test the texture for asbestos before work begins. 54 If the test is positive, hire a certified asbestos abatement professional. 58 If negative, the texture is typically removed by wetting it with water and scraping it off. Skim coating directly over heavy popcorn texture is not recommended, and if the texture has been painted, water may not penetrate to loosen it. 54
Skim Coating Old Plaster Walls
The first step is to check for delamination by tapping the surface and listening for hollow sounds. 72 All loose or crumbling plaster must be chipped away to a solid edge. Large areas may need to be re-anchored with plaster washers and screws before patching. 72
Once repairs are complete, the most critical step for plaster is applying a bonding agent . 89 Old plaster is very porous and can suck water out of new compound, causing it to fail. To prevent this, seal the entire surface with a dedicated plaster bonding agent (like Larsen Plaster-Weld) or a high-quality oil-based primer. 72
Skim Coating Concrete Block (CMU) Walls
Standard gypsum-based joint compound is not suitable for direct application to concrete or block, especially in damp areas. 93 Gypsum is not moisture-resistant and will not bond to the alkaline surface of concrete.
The correct approach is to use a cementitious product, such as a surface-bonding cement or polymer-modified repair mortar. 93 These materials are chemically compatible with masonry. The block wall must be rigorously cleaned of all dust and efflorescence. 93 If the block has been painted, a strong concrete bonding agent is necessary to ensure the new coating adheres. 93
Skim Coating Exterior Surfaces
Applying a skim coat to an exterior surface requires specialized products designed to withstand weather. 52 Exterior-grade skim coats are typically acrylic-based or cementitious formulas engineered for weather resistance and flexibility. 94
Preparation for exterior work is rigorous. The surface must be impeccably clean, and all failing paint, chalkiness, and organic growth must be removed. 94 A penetrating primer may be required to stabilize the surface before coating. 94 The coating is typically applied with a trowel to a thickness of around 6 to 8 mm. 99 A properly applied exterior skim coat system can last 15 to 20 years or more. 100
Drying, Sanding, and Priming
Drying the Joint Compound
Air-dry joint compound hardens through evaporation. Under ideal conditions, roughly 70°F (21°C) and 70% humidity, a standard coat takes about 24 hours to dry. 20 High humidity slows drying, while temperatures below 55°F (13°C) can prevent the compound from bonding correctly. 20
To speed up drying, increase air circulation with fans and use a dehumidifier. A portable heater can raise the temperature, but never aim it directly at wet walls. This causes "flash drying," where the surface skins over while the material underneath stays wet, leading to cracking. 21
Final Sanding and Cleanup
The final sanding generates the finest dust. Executing this step with a focus on dust control is paramount for health and cleanliness. Even with dust control methods, keep the work area sealed off with plastic sheeting. 53
The most effective method is dustless sanding , using a sander attached to a shop vacuum with a HEPA filter to capture dust at the source. 36 Wet sanding is an excellent dust-free alternative for final touch-ups. Use a slightly damp tiling sponge to gently rub any minor imperfections. 35
After sanding, vacuum all surfaces with a HEPA-filtered vacuum. Then, wipe every surface with a damp cloth or tack cloth to remove any remaining fine dust. 39 Any dust left on the wall will prevent the primer from bonding and lead to paint failure. 39
Applying Primer
Applying a high-quality primer over a new skim coat is a critical, non-optional step. The new surface is extremely porous, and if paint is applied directly, it will be absorbed unevenly. This results in a blotchy sheen known as "flashing." 6
The primer's job is to seal the porous surface, creating a uniform foundation for the topcoat. 104 This ensures the paint dries evenly and develops its intended sheen and color.
- Primer Selection: PVA (polyvinyl acetate) primers are formulated for new drywall and are an economical choice. 106 However, higher-quality acrylic-based primer/sealers , like Zinsser Bulls Eye 1-2-3 or KILZ Premium, are thicker and do a superior job of sealing the surface and hiding minor imperfections. 107
- Application and Final Inspection: Apply the primer evenly over the entire surface. Once dry, perform a final inspection with a bright work light held at a sharp angle to the wall to reveal any flaws. Touch up minor spots with compound, sand lightly when dry, and spot-prime the touch-ups before applying the final paint. 106
Troubleshooting and Professional Advice
Common Problems and Solutions
Understanding how to diagnose and fix common issues is key to a successful project.
- Blistering or Bubbling: This occurs when moisture from the compound lifts the drywall paper or old paint. 30 Solution: Do not apply more mud over a bubble. Use a utility knife to cut out the blistered area, removing all loose paper. Seal the exposed area with a shellac-based or oil-based primer, then patch with compound, sand, and spot-prime. 30
- Cracking: Fine cracks are usually caused by applying a coat too thickly. 84 Solution: Minor shrinkage cracks can be filled by the next skim coat. For significant cracking, sand the area and apply the next coat more thinly. If cracks are from structural movement, the joint may need to be re-taped.
- Poor Adhesion and Peeling: This is a sign of total adhesion failure, caused by inadequate surface preparation. 84 Solution: There is no fix other than to start over. Scrape off all failed material, then properly clean, sand, and prime the substrate before trying again.
- Tool Marks, Ridges, and Scratches: These are caused by the knife edge or by dragging dried bits of compound through the wet finish. 87 Solution: Keep your tools clean, wiping the blade after every pass. Between coats, knock down ridges with a scraper. These imperfections must be sanded out during the final sanding.
Professional Standards and Building Codes
While not legally binding for DIY cosmetic work, professional standards provide a valuable benchmark for quality and safety.
- ASTM C840: This is the industry standard for drywall installation and finishing. 115 It defines the levels of finish (0-5), providing a clear quality target. 117 It also specifies requirements like control joints for long walls to prevent cracking. 116
- OSHA 29 CFR 1926.1153: This federal regulation defines the health hazards of silica dust and the required controls. 48 For a DIYer, it is the definitive guide to personal safety, outlining best practices for engineering controls and personal protective equipment. 120
When to Hire a Professional
A careful DIYer can achieve excellent results, but some situations warrant hiring a professional drywall contractor.
- Project Scale: Skim coating an entire home is a massive, labor-intensive undertaking. Professionals have systems and tools to complete large projects much faster. 9
- Hazardous Materials: If testing confirms the presence of asbestos or if a project involves disturbing large areas of lead-based paint , hiring certified abatement professionals is the only safe and responsible choice. 56
- Complex Substrate Issues: If walls have significant structural issues, like severe plaster delamination, a specialist in plaster restoration may be a wiser choice. 72
- The Cost-Benefit Analysis: The cost to hire a professional to skim coat walls ranges from $1.10 to $1.30 per square foot . 125 For a typical 12-by-14-foot room, this translates to a project cost of roughly $500 to $700 . 126 Labor rates for drywall finishers generally fall between $50 and $100 per hour . 126 Weighing these costs against your time, tool acquisition, and learning curve can help you decide whether to DIY or hire an expert.
Works cited
- www.thespruce.com, https://www.thespruce.com/how-to-skim-coat-walls-5116693#:~:text=A%20skim%20coat%20is%20a,Eliminate%20or%20repair%20orange%20peel.
- Pros and Cons of Skim Coat | USG ME, https://www.usgme.com/default/blog/post/pros-and-cons-of-skim-coat
- How and When to Skim Coat Your Walls - Als Taping Tools & Spray ..., https://www.alstapingtools.com/blog/how-and-when-to-skim-coat-your-walls/
- What Is The Purpose Of Skim Coating Drywall? - Cochran & Mann, https://www.cochranandmann.com/blog/what-is-the-purpose-of-skim-coating-drywall
- How to Skim Coat Walls - The Spruce, https://www.thespruce.com/how-to-skim-coat-walls-5116693
- Five Reasons To Apply a Skim Coat | Family Handyman, https://www.familyhandyman.com/article/skim-coat/
- Want to Know the Difference Between Spackle, Joint Compound or Skim Coat? - Paintzen, https://www.paintzen.com/blog/want-to-know-the-difference-between-spackle-joint-compound-or-skim-coat
- Spackle vs. Joint Compound: What's the Difference? - HGTV, https://www.hgtv.com/how-to/home-improvement/what-is-the-difference-between-spackle-and-joint-compound
- The 5 Levels of Drywall Finishing | Master Building Material Blog, https://masterbuildingmaterials.com/blog/the-5-levels-of-drywall-finishing-plus-one-no-one-talks-about/
- Joint Compound vs. Spackle: When to Use Each - The Spruce, https://www.thespruce.com/joint-compound-vs-spackle-5180404
- When can spackle be used instead of mud? - Home Improvement Stack Exchange, https://diy.stackexchange.com/questions/30076/when-can-spackle-be-used-instead-of-mud
- skim coat - mud vs spackle - DoItYourself.com Community Forums, https://www.doityourself.com/forum/patching-plastering/290611-skim-coat-mud-vs-spackle.html
- www.nationalgypsum.com, https://www.nationalgypsum.com/ngconnects/blog/building-knowledge/level-4-vs-level-5-drywall-finish-differences#:~:text=A%20Level%205%20drywall%20finish%20involves%20an%20additional%20skim%20coat,deliver%20a%20smooth%2C%20uniform%20surface.
- Level 4 vs. Level 5 Drywall Finish: Key Differences and Applications, https://www.nationalgypsum.com/ngconnects/blog/building-knowledge/level-4-vs-level-5-drywall-finish-differences
- 5 Levels of Drywall Finishes Gypsum Board, https://cms2.revize.com/revize/berwick/document_center/Code%20Enforcement/5%20levels%20of%20drywall%20finsihes.pdf
- Hey we just paid for our old ceiling to be done with a level 5 finish . I guess I assumed it would be completely mudded and not seeing the panels. Can someone explain lvl 5 to me ? I have no clue about anything drywall - Reddit, https://www.reddit.com/r/drywall/comments/16tvclq/hey_we_just_paid_for_our_old_ceiling_to_be_done/
- Is skim coating necessary? - Forum Archive - Brownstoner, https://www.brownstoner.com/forum-archive/2008/05/is-skim-coating/
- Joint compound - Wikipedia, https://en.wikipedia.org/wiki/Joint_compound
- Joint Compound - Fine Homebuilding, https://www.finehomebuilding.com/project-guides/drywall/joint-compound
- How long does it take joint compound to dry? - USG, https://www.usg.com/content/usgcom/en/resource-center/faqs/73.html
- How Long Does Drywall Mud Take to Dry: Quick Guide for DIYers - Chicago Handyman, https://chicagohandyman.net/how-long-does-drywall-mud-take-to-dry/
- What's the Best Joint Compound for Skim Coating? - YouTube, https://www.youtube.com/watch?v=UtQe5ywgjyI
- DO THIS To Skim Coat Over Your OLD Painted Or Textured Walls! #questio... - TikTok, https://www.tiktok.com/@paulpeckdrywalltube/video/7346785338167168299
- USG Joint Treatment Selection Guide, https://www.usg.com/content/usgcom/en/blog/usg-joint-treatment-selection-guide.html
- DO THIS To Skim Coat Over Your OLD Painted Or Textured Walls! - YouTube, https://www.youtube.com/shorts/Oh6-RqlfSjU
- Which Joint Compound is Better? All Purpose or Taping? - YouTube, https://www.youtube.com/watch?v=GorutlUSDFs
- Choosing the Best Type of Drywall Compound - The Spruce, https://www.thespruce.com/how-to-choose-drywall-mud-844943
- Westpac-Comparison-Chart.pdf, https://www.westpacmaterials.com/wp-content/uploads/2018/02/Westpac-Comparison-Chart.pdf
- What compound should be used for base skim coat? - Home Improvement Stack Exchange, https://diy.stackexchange.com/questions/106345/what-compound-should-be-used-for-base-skim-coat
- More Skim Coating Tips (Bubbles, Drywall Priming, Etc.) - Ugly Duckling House, https://www.uglyducklinghouse.com/skim-coating-tips/
- Working With Setting Compounds | This Is Drywall, https://www.thisisdrywall.com/?p=688
- bernardibuildingsupply.com, https://bernardibuildingsupply.com/choosing-the-right-drywall-joint-compound/#:~:text=Setting%20type%20joint%20compounds%20will,a%20cool%20or%20humid%20environment.
- When to Use Setting Compounds vs. Ready Mix - National Gypsum® Company, https://www.nationalgypsum.com/ngconnects/blog/building-knowledge/setting-compounds-vs-ready-mix
- What Type of Joint Compound to Use for Drywall - Trim-Tex, https://www.trim-tex.com/blog/what-type-of-joint-compound-to-use-for-drywall
- Skim Coat Like A Pro - Making Pretty Spaces Blog, https://makingprettyspaces.com/2019/01/29/skim-coat-like-a-pro/
- How To Skim Coat To Remove Wall Texture | Sawdust Girl, https://sawdustgirl.com/how-to-skim-coat-get-rid-wall-texture/
- Skim Coat Ceilings Drywall Walls | Best Drywall Tools for Skimming | Skimming Blades - G.SB Paint Tools Co., Ltd., https://www.gsbpainttools.com/news/best-drywall-tools-for-skimming.html
- DIY Friendly Tools I Use To Skim Coat With A Paint Roller! - YouTube, https://m.youtube.com/shorts/nfivjqi3OVU
- How do I skim coat walls? Do I need sealer or primer? Both? : r/HomeImprovement - Reddit, https://www.reddit.com/r/HomeImprovement/comments/71n6wq/how_do_i_skim_coat_walls_do_i_need_sealer_or/
- How to Skim Coat: Quick & Easy Steps to Smooth Out Walls - wikiHow, https://www.wikihow.com/Skim-Coat
- Has anyone here successfully skim coated a knockdown texture wall as DIY? - Reddit, https://www.reddit.com/r/paint/comments/mhicxc/has_anyone_here_successfully_skim_coated_a/
- Ultimate Dustless Drywall Sanding System for Sale | Pro Wood Finishes - Bulk Supplies for Commercial Woodworkers, https://prowoodfinishes.com/product/equipment/sanders-dust-extraction/sanding-systems/other-sanding-systems/ultimate-dustless-drywall-sanding-system/
- Control of Drywall Sanding Dust Exposures - CDC, https://www.cdc.gov/niosh/engcontrols/ecd/detail31.html
- Dust Free Drywall Sander - Shop Vac Attachment - Sawdust Girl, https://sawdustgirl.com/dust-free-drywall-sanding/
- USG Sheetrock® Brand Dust Control Joint Compound OSHA FAQ List (English), https://www.usg.com/content/dam/USG_Marketing_Communications/united_states/product_promotional_materials/finished_assets/usg-sheetrock-brand-joint-compound-dust-control-osha-faq-list.pdf
- Control of Drywall Sanding Dust Exposures | NIOSH - CDC, https://www.cdc.gov/niosh/docs/99-113/default.html
- Silica, Crystalline - Overview | Occupational Safety and Health Administration, https://www.osha.gov/silica-crystalline
- Is Your Construction Operation Compliant with OSHA's Silica Standard?, https://www.travelers.com/resources/business-industries/construction/how-does-silica-standard-apply-to-construction-operations
- OSHA's Respirable Crystalline Silica Standard for Construction, https://www.osha.gov/sites/default/files/publications/OSHA3681.pdf
- Drywall Sanding and Dust Collection Article | CS Unitec, https://www.csunitec.com/resource-center/articles/drywall-dust-collection-and-drywall-sanding-dust-control
- USG Sheetrock Brand 3.5 gal. Dust Control Ready-Mixed Joint Compound 380059048, https://www.homedepot.com/p/USG-Sheetrock-Brand-3-5-gal-Dust-Control-Ready-Mixed-Joint-Compound-380059048/202329612
- Sheetrock® Brand Dust Control Joint Compound - USG, https://www.usg.com/content/usgcom/en/products/walls/drywall/joint-compound/lightweight-joint-compounds/sheetrock-dust-control-joint-compound.html
- 5 Tips for Efficiently Sanding Drywall That Decrease Dust - Woodsmith, https://www.woodsmith.com/review/sanding-drywall/
- How to Properly Remove Spray-on “Popcorn” Ceilings - Southwest Clean Air Agency, https://www.swcleanair.gov/docs/misc/asbestos_popcorn_ceiling.pdf
- Popcorn Ceiling Asbestos Testing : How to Test Asbestos Yourself, https://biggerthanthethreeofus.com/popcorn-ceiling-asbestos-testing/
- When to Test for Asbestos in Popcorn Ceilings - JSE Labs, https://jselabs.com/blog/popcorn-ceiling-asbestos/
- Post-Disaster Renovations and Asbestos for Homeowners and Workers - EPA Archives, https://archive.epa.gov/region02/capp/web/pdf/r2asbestos.pdf
- Protect Your Family from Exposures to Asbestos | US EPA, https://www.epa.gov/asbestos/protect-your-family-exposures-asbestos
- Lead-Safe Renovations for DIYers | US EPA, https://www.epa.gov/lead/lead-safe-renovations-diyers
- EPA - Steps to Lead Safe Renovation, Repair and Painting - Illinois Department of Public Health, https://dph.illinois.gov/content/dam/soi/en/web/idph/files/publications/stepsto-lead-safe-renovation-repair-and-painting-042016.pdf
- The Lead-Safe Certified Guide to Renovate Right - Environmental Protection Agency (EPA), https://www.epa.gov/sites/default/files/documents/renovaterightbrochure.pdf
- Lead Renovation, Repair and Painting Program | US EPA, https://www.epa.gov/lead/lead-renovation-repair-and-painting-program
- Learn How To Reduce Drywall Dust Like A Pro With These Easy Tips! - Contractor Plus, https://contractorplus.app/blog/how-to-reduce-drywall-dust/
- Need To Skim Coat Over Your Wallpaper? DO THIS! - YouTube, https://www.youtube.com/watch?v=7kcV_vdS6DI
- Guide to Ladder Safety for Painters | BEHR PRO, https://www.behr.com/pro/onthejob/blog/ladder-safety/
- Ladders for Painters: How to use Ladder For Painting, https://laddersafetyrails.com/blogs/blog/ladders-for-painters
- Choosing the Best Ladders for Painting - Benjamin Moore, https://www.benjaminmoore.com/en-us/contractors/job-solutions/professional-how-to-guides/best-ladders-for-painting
- Finishing Gypsum Panels in Cold, Humid, or Critical Light Conditions - USG, https://www.usg.com/content/usgcom/en/blog/finishing-gypsum-panels-cold-humid-critical-light.html
- TEMPERATURE & HUMIDITY WHILE HANGING AND FINISHING DRYWALL AND AFTER (Before, During, and After), https://www.thisisdrywall.com/?p=267
- skim coat over gloss paint? - Fine Homebuilding, https://www.finehomebuilding.com/forum/skim-coat-over-gloss-paint
- www.thespruce.com, https://www.thespruce.com/how-to-skim-coat-walls-5116693#:~:text=Sand%20first%3A%20Sand%20down%20high,and%20as%20few%20as%20possible.
- How to fix this? Skim coat/paint over plaster wall. : r/HomeImprovement - Reddit, https://www.reddit.com/r/HomeImprovement/comments/d48d23/how_to_fix_this_skim_coatpaint_over_plaster_wall/
- How to Skim Coat Walls (DIY) | Family Handyman, https://www.familyhandyman.com/project/how-to-skim-coat-walls/
- Can I skim coat an already-painted wall? Any prep of the surface required? - Reddit, https://www.reddit.com/r/HomeImprovement/comments/kcqesb/can_i_skim_coat_an_alreadypainted_wall_any_prep/
- Skimming a Wall - Insidespaces, https://insidespaces.org/projectpages/wall-skim/wall-skim-print.shtml
- How to Avoid Torn Drywall Paper Bubbles Before Skim Coat - YouTube, https://www.youtube.com/watch?v=GchIY9snBN4
- HOW and WHAT I Use to Mix for Skim Coating! - YouTube, https://www.youtube.com/watch?v=DaXObeFwsEg
- How To Mix Up Joint Compound For Skim Coating! - YouTube, https://www.youtube.com/watch?v=DEOLnzzin2g
- What Is Skim Coating And Why Would I Need To Do It? - YouTube, https://www.youtube.com/shorts/NR4aXhpjeE4
- THE BEST Skim Coating Tools For DIY'ers And Beginners! - YouTube, https://www.youtube.com/shorts/ZDYxPn-ucVc
- How to Skim Coat a Wall - YouTube, https://www.youtube.com/watch?v=0j4chs3HhoA
- How To Roll On The Skim Coating Compound Using A Paint Roller! - YouTube, https://www.youtube.com/watch?v=SkhQuRhjkQI
- Skim Coating Walls and Ceilings: How Not To Make It A Pain In the Ass | Brad the Painter, https://www.bradthepainter.com/skim-coating-walls-and-ceilings-how-not-to-make-it-a-pain-in-the-ass/
- Common Skim Coating Mistakes and How to Avoid Them - Property Solutions 561 LLC, https://propertysolutions561fl.com/blog/common-skim-coating-mistakes-and-how-to-avoid-them/
- Everything You Need to Know About Skim Coating, https://www.southcentralpapatchboyspa.com/everything-you-need-to-know-about-skim-coating
- Skim Coat question - Fine Homebuilding, https://www.finehomebuilding.com/forum/skim-coat-question
- Failure skim coating : r/HomeImprovement - Reddit, https://www.reddit.com/r/HomeImprovement/comments/9iwk9z/failure_skim_coating/
- Delaminating Plaster | Screwfix Community Forum, https://community.screwfix.com/threads/delaminating-plaster.251502/
- How To Patch Plaster Perfectly - This Old House, https://www.thisoldhouse.com/walls/21015207/patching-plaster
- Do I need to use a bonding agent between scratch and base coat plaster on the ceiling?, https://diy.stackexchange.com/questions/203422/do-i-need-to-use-a-bonding-agent-between-scratch-and-base-coat-plaster-on-the-ce
- skim coating plaster walls and ceiling - Fine Homebuilding, https://www.finehomebuilding.com/forum/skim-coating-plaster-walls-and-ceiling
- Plaster repair & Plaster Weld - Fine Homebuilding, https://www.finehomebuilding.com/forum/plaster-repair-plaster-weld
- Any product suggestions for a skim coat with good adherence for basement walls? Thanks : r/Concrete - Reddit, https://www.reddit.com/r/Concrete/comments/10lzw8z/any_product_suggestions_for_a_skim_coat_with_good/
- Handycoat Exterior | Ready-mixed Skimcoat for Exterior Surfaces - Terraco, https://www.terraco.com/products/handycoat-exterior/
- SikaWall®-198 Finish 2-in-1 | Skim Coat for External Wall - Sika Malaysia, https://mys.sika.com/en/construction/plastering-skim-coat/skim-coat/sikawall-198-finish2-in-1.html
- How to Skim Coat Exterior Cinder Block Wall: A Step-by-Step Guide, https://www.coohom.com/article/how-to-skim-coat-exterior-cinder-block-wall
- SKIM LITE - Laticrete, https://www.laticrete.com/en/products/skim-lite
- Skim Coat Innovation: Latest Products & Trends - Duraamen, https://duraamen.com/blog/your-guide-to-the-latest-updates-in-skim-coat-products/
- Skim Coating an External Wall - YouTube, https://www.youtube.com/watch?v=Vb1E-ei0K_M
- When to Reskim Stucco, https://www.vampstucco.com/when-to-reskim-stucco/
- Skim Coat and Wall Putties Put Through Their Paces - Wacker Chemie AG, https://www.wacker.com/cms/en-us/products/insights/skim-coat-test-methods.html
- JOINT COMPOUND DRYING TIME The Impact of Environmental Conditions - Drywall Finishing Council, https://dwfc.org/download/2010_03_16_Joint_Compound_Drying.pdf
- The Effect of Environmental Conditions on Drywall Installation & Finishing - USG, https://www.usg.com/content/usgcom/en/blog/negative-jobsite-effects-drywall-installation-finishing.html
- How to Fix Paint Flashing | Uneven Paint - Sherwin-Williams, https://www.sherwin-williams.com/en-us/project-center/maintenance-repair/paint-flashing
- How to avoid flashing when repairing holes in the wall - Corspaint, https://corspaint.com/how-to-avoid-flashing/
- How To Avoid Paint Flashing, Streaks, Lap Marks On Walls - Eco Paint, Inc., https://www.paintingdenver.net/uncategorized/avoid-paint-flashing-streaks-lap-marks/
- From Flashing to Flawless Finish - PPC, https://swppc.com/2022/12/09/from-flashing-to-flawless-finish/
- The Best Drywall Primers for Different Surfaces and Purposes - Painters Springfield MA, https://bradwillardpropainting.com/the-best-drywall-primers-for-different-surfaces-and-purposes/
- Priming new drywall, Cant figure out what to use. : r/paint - Reddit, https://www.reddit.com/r/paint/comments/1jfae6t/priming_new_drywall_cant_figure_out_what_to_use/
- Best Primer for Drywall and Repairs! - YouTube, https://www.youtube.com/watch?v=DfrG45OIX6k
- Getting flashing through paint after applying primer - Reddit, https://www.reddit.com/r/paint/comments/17pcss8/getting_flashing_through_paint_after_applying/
- Where did I go wrong with my skim coat? It turned out terribly. : r/HomeImprovement - Reddit, https://www.reddit.com/r/HomeImprovement/comments/y9c9hl/where_did_i_go_wrong_with_my_skim_coat_it_turned/
- Can You Skim Coat Over Wallpaper? (Explained) - Lets Upgrade Painting, https://letsupgradepainting.com/can-you-skim-coat-over-wallpaper/
- Is this not the easiest way for a perfect drywall skim coat? - DoItYourself.com, https://www.doityourself.com/forum/patching-plastering/540283-not-easiest-way-perfect-drywall-skim-coat.html
- ASTM C840-03 - Standard Specification for Application and Finishing of Gypsum Board, https://webstore.ansi.org/standards/astm/astmc84003
- Control Joints in Interior Gypsum - Association of the Wall and ..., https://www.awci.org/media/codes-standards/control-joints-in-interior-gypsum/
- Finishing Drywall Systems - USG, https://www.usg.com/content/dam/USG_Marketing_Communications/canada/product_promotional_materials/finished_assets/cgc-construction-handbook-ch05-finishing-drywall-systems-can-en.pdf
- Occupational Exposure to Respirable Crystalline Silica 29 C.F.R. § 1926.1153 - OSHA, https://www.osha.gov/silica-crystalline/construction-info
- 29 CFR 1926.1153 -- Respirable crystalline silica. - eCFR, https://www.ecfr.gov/current/title-29/subtitle-B/chapter-XVII/part-1926/subpart-Z/section-1926.1153
- 1926.1153 - Respirable crystalline silica. | Occupational Safety and Health Administration, https://www.osha.gov/laws-regs/regulations/standardnumber/1926/1926.1153
- Resources for preventing silicosis - Natural Stone Institute, https://www.naturalstoneinstitute.org/silica/
- Silica Safety Resources | James Hardie, https://www.jameshardie.com/build-with-hardie/safety-resources/silica-safety-resources/
- Builders Boost Confidence with Home Warranties & OSHA Silica Compliance - PWSC, https://www.pwsc.com/home-builder-warranties-osha-silica-standards/
- Skim Coating - Fine Homebuilding, https://www.finehomebuilding.com/project-guides/drywall/skim-coating
- homeguide.com, https://homeguide.com/costs/cost-to-skim-coat-walls#:~:text=Tips%20for%20hiring-,Average%20skim%20coat%20cost,and%20adds%20a%20smooth%20finish.
- How Much Does It Cost to Skim Coat Walls? [2025 Data] | Angi, https://www.angi.com/articles/cost-to-skim-coat-drywall.htm
- Skim Coating Pricing 101: Pristine Painters NYC's Guide, https://pristinepaintersnyc.com/how-much-does-skim-coating-cost/